
You can build very good strategy around pivot points. Thanks to them, you are trading with tools used on trading floors. We have few types of pivot points:
- daily
- weekly
- monthly
- and others, based on time frame
Lines comes from mathematic formula which is based on data from previous period. So daily pivot points are based on previous day, weekly are based on previous week etc. If you are interested in the mathematic formula, you can easily search in online. I do not want to go to much into details here. We have in a result few lines:
- pivot line – this is a line in a middle
- below pivot, we have S1, S2, S3… support lines
- above pivot, we have R1, R2, R3… resistance lines
When price is going down, it is possible that it will find support at one of S lines. In most cases it will be S1 or S2. When price is going up, it is possible that it will stop at one of R lines – most often R1 or R2.
Thanks to that we have knowledge about possible support and resistance lines. When a trading day starts, I check position of price: is it above pivot line or below?
When a price is above pivot line, then pivot line should act as support and it is possible that price will go up.
Pivot is a central line so the price will often return to its pivot. When it does, you check how it reacts against pivot. Let’s say that price starts day 14 pips above pivot line. It is in a range move, but eventually moved down toward pivot line. We expect price to find some support here. Pivot holds and we saw a move up. We got signal from oscillator to go long and we opened position. R1 and R2 are our targets.
If pivot fails as support then we may expect a move lower to the S1 or S2 line.
It is good to combine this with a signal. It may be a cross of two averages, a signal from oscillator, from price action or other.
Let’s move to the examples and check how it works in practice.
EURUSD, 5m chart
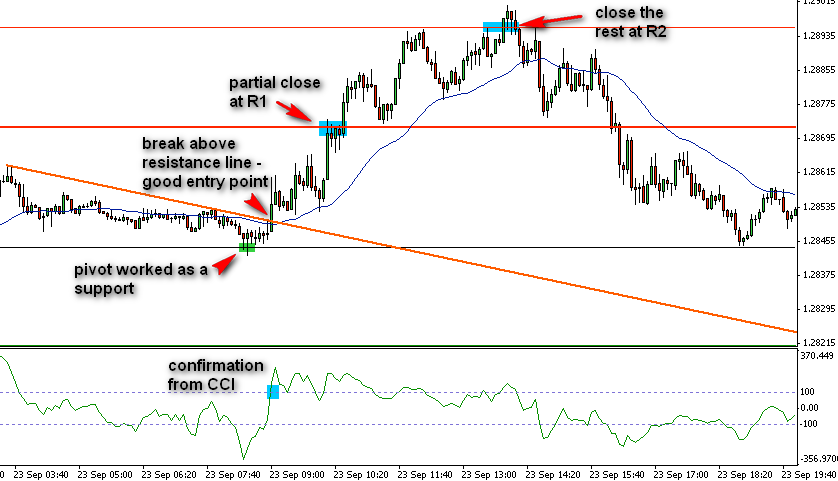
2.1. Long play after break above trend line
In the morning price was holding above pivot line (black line). It acted as support (green rectangle) and later we had a breakout above the trendline. We also had a signal from CCI 33 when it crossed above 100 level (blue rectangle on CCI). Above we have two resistance areas: R1 and R2. For a moment price stopped at R1, but later it moved up to R2. For the first time it missed to touch it by few pips, but later it succeeded. R1 and R2 were our exit points. When I see that move is strong (with tall candles) then I will wait for R2. In many cases I do as follow:
- close part of my position at R1 and take profit
- rise stop loss and set take profit target at R2
- use trailing stop loss in case price will turn around
Remember, on many times drawing a trendline is a good way of trying to open a position in a right direction.
EURUSD, 5m chart

2.2. Pivot failed as support
EURUSD started day below 33 moving average and above pivot line. It also failed to hold above pivot line. Later we saw that moving average is acting as resistance (red rectangle) so this was a signal that downtrend may be stronger. The good entry point was right after that, when price bounced from average and went down below recent low.
Later it stopped only for a moment at S1, then we saw some move down and up, but the trend continued down. This is a good example that price will not always stop exactly at S1, S2 or R1, R2 lines. But does it really matter for us? We executed our trading plan – entered when pivot failed to hold price, closed at S1 and left some position open. We did not get top or bottom, but still ended with profit.
EURUSD, 5m chart
2.3. Beartrap and strong move up
This is a more complicated example. Price was holding above pivot line, but did not make attack to the R1 line. Later we saw a trap for bears. Price reversed and quickly got to the R1 line and then higher. It was a tricky day, you would be probably stopped out or enter a long to late. Just wanted to show you that sometimes you might expect traps around important levels. That is why it is so important to remember about stop losses and right money management.
EURUSD, 5m chart
On some days it is nice and simple. Price was below pivot line for a half of day and failed to move higher. We got a signal from CCI (brake below -100) and brake below a trendline. It rebounced from trend line and we saw a sell-off with a short pause at S1 and end of move at S2. It is rather common that you will see candles like that one at S2.

2.4. Trade from pivot, down to S2
Move from R2 to S2
Theory says that after price reaches S2 line it may move up to the R2 line as in the example above. But it is not always that simple…

2.5. Move from S2 to R2
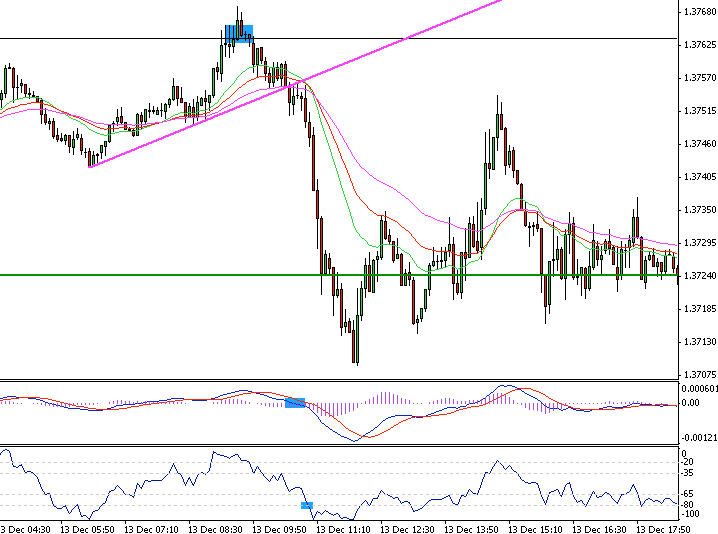
EURUSD, 5m chart

2.6. Strong trend and move down to S3
In the morning price was holding above pivot line (black line) and pivot acted as support. R1 was very close (13 pips away from pivot line). You can see how big sell-off started from there. You could enter after signals from CCI (blue rectangle) or after short breakout (when pivot failed as support). This example is interesting because EURUSD managed to get to the S3 line (which happens very rarely). According to trading plan, we would close half of position at S1 and rest at S2. Sometimes when you see that one side is dominating (like bears in that case) it is good to wait it out and see what happens next. Just move your trailing stop loss and wait or switch to a lower time frame and close from there.
Note: sometimes I modify my plan like in this example and do not close at S2 and wait for S3 but I always close at S3 (or R3). I mean, it is very uncommon for price to breakout below S3 line, you may see some false breakouts here and traps. It is better just to close position and call it a day.
EURUSD, 5m chart
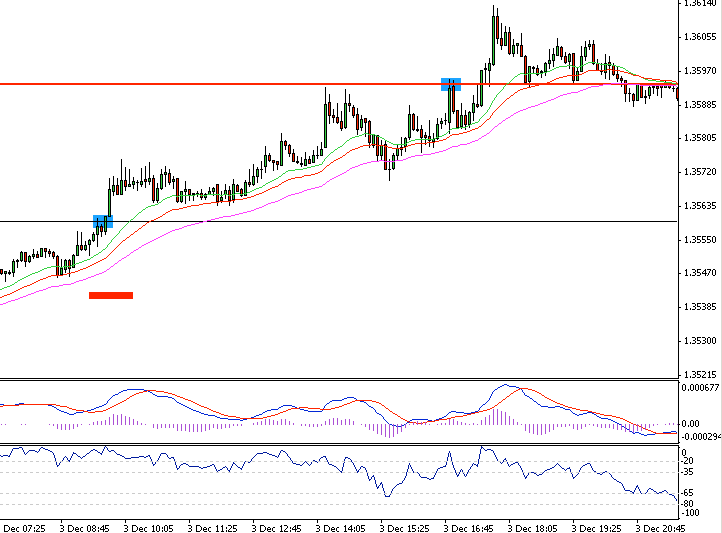
2.7. Nice trend in place, but price failed to move up to the R2 line
This is a simple trade. We can see from trendlines that uptrend is in place. Notice that EURUSD started day below pivot point. It was a good idea to wait and check if it will act as resistance. It did not and EURUSD continued move up. This was our entry point (blue rectangle), stop loss would be placed below recent low (or below 55 average – up to you). Target is R1 and R2. As you can see for first two times price missed R1 for few pips but eventually the first target was hit.
Later we saw a continuation of move towards the R2 line. Look what happened. Price stopped in the middle (probably at Fibo extension) and it reversed. It failed to move to the R2 target. It happens – sometimes it looks like bulls are in control, but bears may come from nowhere. Anyway, in the end of the trading day you should close this trade or be stopped out at trailing stop loss.
EURUSD, 5m chart
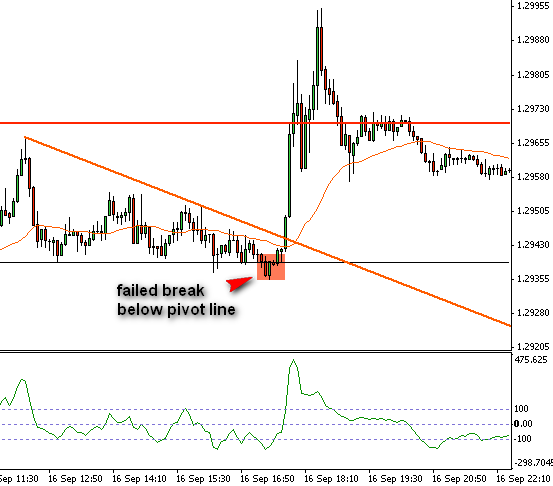
2.8. Failed break above pivot and move down after break below trendline
Day started with an attack on pivot point and breakout which eventually failed (blue rectangle at pivot). Price was still above trendline so we had to wait what is going to happen. Bears were stronger and trendline failed. We had short breakout and sell signals from MACD and Williams %R. First target S1 was hit, later we saw a continuation of move down, but bulls came back to the game. EURUSD failed to move to the second target (S2), just like in example before. This is why it is a good idea to close half position at S1 level and take profit. We would be stopped out from second half, but end day with profit and it is what matters.
Oh, look how noisy it was later. With trading plan and clear targets and entry rules we would stay out of it.
SPX, 5m chart

2.9. Example of reentry a trade in strong trade
Another example that sometimes a price can get to the S3 support line. Let’s analyze this example.
The day started with narrow move bellow pivot line and above trendline (lows from left used to draw a trendline are not visible on chart). Then we had a signal from MACD (cross below 0 line, blue rectangle on MACD), and later a short breakout below trendline (blue rectangle). This was our short entry point. Best place for stop loss was above pivot line. Targets were S1 and S2. An S1 line was hit, we closed half of our position here. There were no support at S1 and sp500 moved down to the S2 line – this was our second target and we closed second half here.
We saw some correction to the 55 EMA (violet), but it acted as resistance and bears came back. I like when average act as resistance (or support) because I know that I can set a stop loss on the other side of that average. Ok, but back to bears. They came back but we already had a trendline in place. SP500 broke below that trendline and below S2 line. This was a good place to go short again, with a stop loss above 55 moving average. The target was an S3 line which was hit a little while later.
You can see that there was some short breakout at S3 line, but it failed. I never go short at S3 line (or long at R3 line), because it is possible that this will be a trap.
SPX, 5m chart

2.10. Trade on SPX. First TP target hit at S1
When we started a day? The price was above and below pivot line (black line). Not sure about a current situation? MACD lines are below 0 line, we had also negative averages (21 below 33, 33 below 55). Even when price was above the pivot, we knew that situation is not clear. Magenta trend line was based on lows from the left side (you can’t see them on chart). Around 9 am we saw that something is going on. SPX broke below this trendline. With negative averages and MACD below 0 line, this was a good short entry point. Best place for stop loss was above recent lower high (1972 points), targets as usual S1 and S2. SPX hit S1 line (closed half position here) and move continued. As you saw before, it failed to get to the S2 line. Still, we had profit from S1 line and were stopped out from the second half (also with profit).
SPX, 5m chart

2.11. Pivot failed as support and move down to S2
S&P500 was moving in a range above 1990 points, but later price moved down. We got the signal from MACD (a move below 0 line) and averages (negative), but SP500 was still above pivot line. This was still too risky. After a while, we saw a break below pivot line and strong move down began. First target S1 was hit, support here was very weak. Move down continued towards S2 were we closed second half of position. Nice end of trading day.
Again, you can see some choppy moves later, but with clear targets, we do not lose money when the market is choppy.
SPX, 5m chart

2.12. Rapid moves after data publication
No trade here, just a lesson that sometimes markets are volatile and you will simply fail. It looked that this a start of a strong move down, but at pivot line bulls came back and price reversed and quickly got to the R1 line (because of news). No way to catch this sort of moves, but you can try to avoid that. Simply check if there is no important data published. You can check this on sites like http://forexfactory.com.
SPX, 5m chart

2.13. Stron move up to R3 level
For the first half of day SP500 was between pivot line (below) and S1 line in narrow range. Later bulls decided to attack pivot line and managed to break out. This was a good long entry point with stop loss below recent low (so somewhere below S1 line). R1 line was hit, and later we saw a continuation of move towards S2 where our second targer was hit. Bulls wanted more and move up continued – you could try to catch it with tigh stop loss and close at R3 line. This was a great day for bulls, we saw over 20 points gain on SP500, and still pivot lines worked great.
SPX, 5m chart

2.14. Enter example after move to S1
Day started with range move. For a moment it looked like bulls are winning, if you went long, you should be stopped out. It is normal – sometimes you will open trade in a wrong direction, but you should be able to switch when situation changes. In this case SPX closed below pivot line and trendline – this was a signal to go short. Targets as always – S1 and S2. S1 was hit a little while later (we closed here half of position), then we saw some false breakout. Second half was still open and move continued to the S2 where we closed the rest.
Check the moment after a false short breakout at S1. Price moved up back to the 33 average. Rememeber, we had openen second half of position. For me, the stop loss is always above 55 average, because when trend is strong then it should not get above this average.
USDJPY, 5m chart

2.15. Trades in stron g trend
Downtrend, pivot line failed and USDJPY went down to the S1 and S2 lines. Just wanted to show you that when trend is strong (averages are wide separated) then you simply place stop loss on the other side of averages (red rectangle) and you move it together with average. So when you have second half of position around S1 line, then you move stop loss around 109.35, your take profit target is S2 line. It is not always that easy as on chart above, but when markets are trending, then follow simple plan and make money.
USDJPY, 5m chart
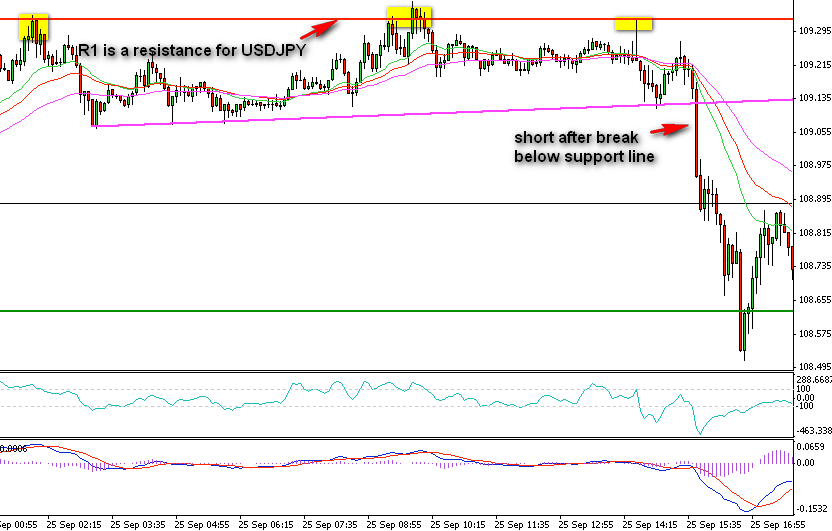
2.16. R1 as a resistance and break below support
In previous examples we waited for price to be at right side of pivot line (so going short when price is below pivot, long when is above pivot). There are days like on chart above, when you may try something different. It was clear that R1 line is a strong resistance. During 12 hours USDJPY failed to force it. By that time we could draw a trendline which eventually failed and we saw a short breakout. Move continued straight down to the S1 line. In this situation stop loss area was clear – above R1 line, so it was a good risk/reward situation.


